nächste Frage

bei mehreren Kopfdichtungen steht Zylinderkopfschrauben nicht enthalten, bei einigen steht wechsel der Kopfschrauben empfohlen, aber die meißten Kopfschrauben sind ab '94 bzw '98 ?
ist mein 91er da anders?
Tante edith:
CYLINDER HEAD
Removal
1) Disconnect negative battery cable. Drain cooling system.
Disconnect hoses at thermostat housing. Remove intake and exhaust
manifolds. See the following:
* INTAKE & EXHAUST MANIFOLD (4.0L)
.
* INTAKE & EXHAUST MANIFOLD (4.2L)
.
2) Disconnect and mark all hoses and electrical connections
at cylinder head. Disconnect and mark spark plug wires. Remove spark
plugs. Remove valve cover bolts.
3) Remove the rocker arms and the push rods. Remove cylinder
head bolts. Remove cylinder head. See ROCKER ARMS & BRIDGE.
Inspection
Inspect cylinder head for cracks or damage. Using
straightedge, check cylinder head for warpage in several areas. Repair
or replace cylinder head if warpage exceeds .002" (.05 mm) per each 6"
(152 mm) or damage exists.
Installation
1) Ensure all gasket surfaces are clean. Clean carbon from
combustion chambers and tops of pistons. Apply sealant to both sides
of new cylinder head gasket. Install new gasket with the word "TOP"
upward. Ensure all holes are aligned.
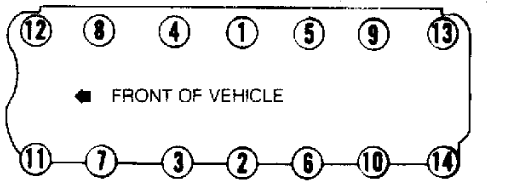
2) Install cylinder head. Apply sealing compound to threads
of cylinder head bolt No. 11 prior to installation. See Fig. 3.
Install head bolts.
3) Tighten all bolts in sequence (except No. 11) to 110 ft.
lbs. (149 N.m) on 4.0L or 85 ft. lbs. (115 N.m) on 4.2L models.
Tighten No. 11 head bolt to 100 ft. lbs. (136 N.m) on 4.0L or 75 ft.
lbs. (136 N.m) on 4.2L. See Fig. 3.
4) Reverse removal procedure for remaining components.
Install valve cover and new gasket. Tighten bolts to specification.
5) Refill and purge cooling system. See COOLING SYSTEM AIR
PURGE under WATER PUMP in this article.
Fig. 3: Cylinder Head Bolt Tightening Sequence
Courtesy of Chrysler Motors.
Valve Arrangement
E-I-I-E-I-E-E-I-E-I-I-E (Front-to-rear)
in dieser Anleitung steht auch nix von neue Schrauben... Aaaach Menno.

 -> in der


 Kopfpackung fast 3x so teuer!
 das rechnet sich nicht.